Project Management
Learn how to create and manage projects on the Nimbuz platform. Deploy your application or tool on the Nimbuz platform with this step-by-step guide.
Understanding Projects
Projects group related apps, services, and resources into a single unit for managing environments, access controls, and deployments. Each project can contain multiple environments (dev, staging, production) and can be deployed across different regions.
Creating Your First Project
After successful login, you'll be directed to the Projects homepage.
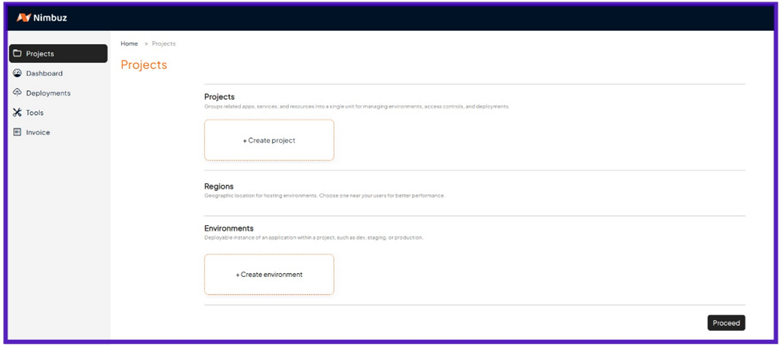
Projects homepage showing existing projects and create button
Step 1: Navigate to Projects
From the sidebar, navigate to Projects. On the Projects page, click the + Create Project button, then click Proceed at the bottom.
This will open the Create Project form for further configuration.
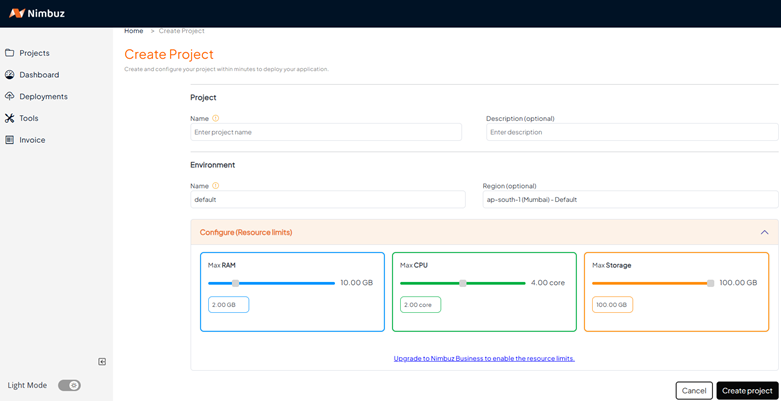
Project creation form with all configuration options
Step 2: Configure Project Details
Fill in the following information:
Basic Information
-
Project Name (optional): Enter a unique name for the project, e.g., My-Awesome-App. (The user may choose to skip this step as this is optional)
-
Description (optional): Optionally enter a description to explain what this project is about.
Environment Configuration
-
Environment Name: By default, it will be set to default. The user can change this if they want to create a custom environment name. (The user may choose to skip this step as it is optional)
-
Region: Select a deployment region for your environment ("ap-south-1 (Mumbai)")
-
Environment Name: By default, it's set to "default"
- You can change this to create a custom environment name
- Examples: "development", "staging", "production"
- This step is optional
-
Region: Select a deployment region for your environment
- Default: "ap-south-1 (Mumbai)"
- Choose a region close to your users for better performance
- Consider data residency requirements for your application
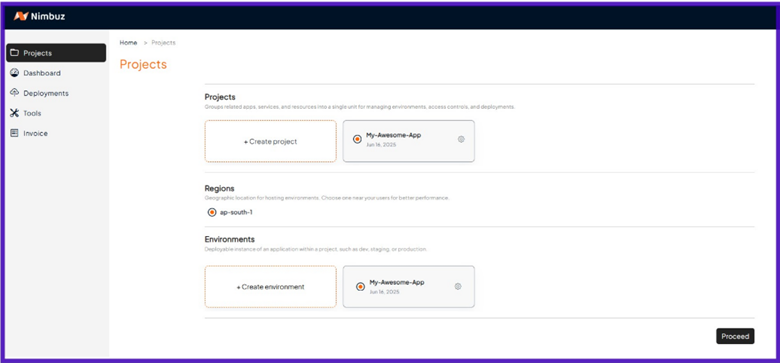
Step 3: Create Project
After filling in all the necessary information, click the Create Project button at the bottom right. A confirmation message will appear: "Project created successfully."
You created your first project successfully!
The user will be redirected back to the Projects page where you can see your newly created projects.
Project Preferences
Each project has comprehensive settings that can be accessed through the project preferences screen.
Accessing Project Preferences
Click the gear icon ⚙️ next to the project name, this will open the project preferences screen.
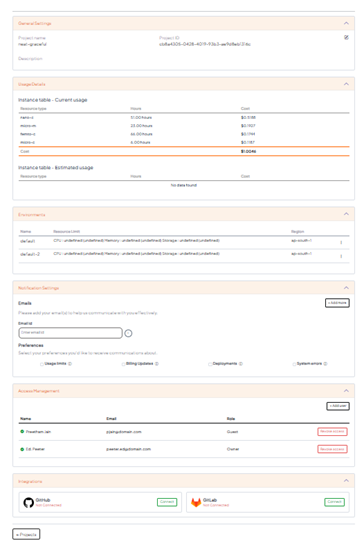
Project Preferences Screen
The Project Preferences screen includes the following sections:
General Settings
Click the pencil icon to edit the project name and description. Changes can be saved after editing.
Usage Details
Displays current and estimated usage, including instance types, hours of usage, and the corresponding cost.
Environments
- Environment Status: See the current state of each environment
Notification Settings
Configure alerts and notifications:
Email Recipients: Email addresses that will receive notifications for:
- Usage Limits Exceeded: Alerts when resource limits are reached
- Billing Updates: Payment and invoice notifications
- Deployment Updates: Deployment status changes
- System Errors: Critical system alerts and failures
Access Management
Control who can access your project:
- Add Users: Invite team members to the project
- Assign Roles: Set appropriate permissions for each user
- Role Types:
- Admin: Full project access and management
- Developer: Deploy and manage applications
- Viewer: Read-only access to project resources
Integrations
Connect external services:
- GitHub Integration: Connect your GitHub repositories
- GitLab Integration: Connect your GitLab repositories
- Webhook Configuration: Set up custom webhooks for CI/CD
- API Access: Configure API keys and permissions
Environment Management
Environments are deployable instances of your application within a project.
Creating Additional Environments
- From the sidebar, navigate to Projects
- Click "+ Create Environment" button
- Fill in the environment configuration:
Environment Configuration
- Project Name: Select an existing project from the dropdown
- Environment Name: Create a custom environment name (default: "default")
- Examples: "staging", "production", "testing"
- This step is optional
- Region: Select deployment region (default: "ap-south-1 (Mumbai)")
- Click "Create Environment" button
- Confirmation message: "Environment created successfully."
Environment Resource Limits
Each environment has configured resource limits that will be displayed:
- CPU Limits: Maximum CPU allocation
- Memory Limits: Maximum RAM allocation
- Storage Limits: Maximum storage allocation
- Network Limits: Bandwidth and connection limits
Environment Preferences
Access environment-specific settings by clicking the gear icon ⚙️ next to the environment name.
Environment Settings Sections
General Settings
- Edit environment name
- Update environment description
- Save configuration changes
Usage Details
- Current resource utilization
- Estimated costs for the environment
- Instance types used within the environment
- Hours of usage and corresponding costs
Access Management
- Add users to the environment
- Assign environment-specific roles
- Manage permissions for environment resources
Resource Limits
- View maximum RAM allocation
- View maximum CPU allocation
- View maximum Storage allocation
- Modify limits based on requirements
Project Operations
Deleting Projects
⚠️ Warning: Deleting a project is permanent and cannot be undone.
- Go to Project Preferences page
- Click the ellipsis (⋮) menu
- Select "Delete" from the dropdown
- Click "Confirm" in the deletion dialog
What gets deleted:
- All environments within the project
- All deployments and applications
- All tools and services
- All project data and configurations
- All usage history and metrics
Deleting Environments
Similar to project deletion:
- Go to Environment Preferences page
- Click the ellipsis (⋮) menu
- Select "Delete"
- Click "Confirm" in the confirmation dialog
What gets deleted:
- All deployments in the environment
- All tools and services in the environment
- All environment-specific configurations
- All usage data for the environment
Quick Navigation with Switch Component
The switch component provides rapid navigation across projects, regions, and environments.
Using the Switch Component
The switch component is available across all screens and shows your current context:
Format: project-name in region region-name with environment environment-name
Example: 'neat-graceful' in region 'ap-south-1' with environment 'default-2'
Switching Context
- Click the "Switch" button
- Select from available options:
- Project: Choose any available project from dropdown
- Region: Select target region
- Environment: Pick environment within the selected project
- Click "Proceed"
What Updates When Switching
When you switch context, the following will reload based on your selection:
- Dashboard metrics and analytics
- Deployment listings and status
- Tools and services
- Resource usage statistics
- Cost and billing information
Best Practices
Project Organization
- Naming Conventions: Use consistent, descriptive names
- Environment Strategy: Separate dev, staging, and production
- Region Selection: Choose regions close to your users
- Documentation: Maintain clear project descriptions
Access Management
- Principle of Least Privilege: Grant minimum necessary access
- Regular Reviews: Audit user access periodically
- Role-Based Access: Use appropriate roles for team members
- Team Organization: Group users by function and responsibility
Resource Management
- Monitor Usage: Regular review of resource consumption
- Set Limits: Configure appropriate resource limits
- Cost Optimization: Right-size environments based on needs
- Environment Lifecycle: Remove unused environments
Troubleshooting
Common Issues
Project Creation Fails
- Check project name uniqueness
- Verify region availability
- Ensure proper permissions
- Contact support if issues persist
Environment Access Issues
- Verify user permissions
- Check environment status
- Confirm region accessibility
- Review access management settings
Resource Limit Errors
- Review current resource usage
- Check environment limits
- Consider upgrading limits
- Optimize resource consumption
Next Steps
With your project set up, you're ready to:
- Deploy your first application
- Set up tools and services
- Configure monitoring and alerts
- Manage team access
Support
Need help with project management?
- Email: projects@nimbuz.cloud
- Live Chat: Available 24/7 in your dashboard
- Documentation: Comprehensive project guides
- Video Tutorials: Step-by-step project setup guides